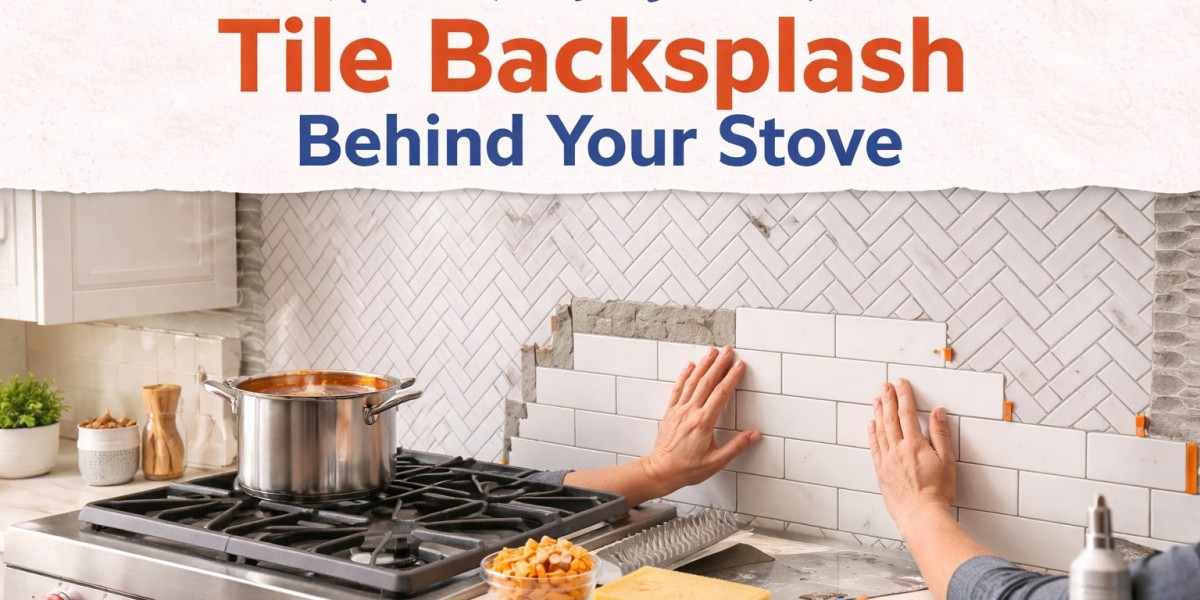
The area behind your stove takes more abuse than any other part of your kitchen. Grease, steam, heat, spatters from a pan that got a little too enthusiastic. And yet, most people spend more time picking out cabinet hardware than thinking about what actually goes on that wall. A tile backsplash behind the stove is not just about looks. It is one of those things where function and appearance genuinely go hand in hand, and once you have done it yourself, you will wonder why you ever put it off.
This is not a tutorial written by someone who read about it once. These are the kinds of details you only pick up after standing in a kitchen with thinset drying on your hands, trying to figure out why your second row is already off.
Why This Specific Area Matters More Than The Rest
Directly behind the stove is technically a heat zone, and that changes everything. Regular drywall cannot handle the consistent temperature shifts. Paint blisters. Grout can crack if the tile itself is not rated for heat exposure. Most building codes also require a non combustible surface behind cooking surfaces, so beyond aesthetics, this is actually a safety matter.
A properly installed kitchen backsplash installation also protects the wall from moisture that builds up during cooking. That moisture does not just disappear. Over time it works into drywall, causes mold, and weakens the wall structure. Tile creates a sealed barrier when grouted correctly.
Tools And Materials You Will Actually Need
Do not let anyone convince you this is a two-tool job. Here is what you realistically need before you start:
Notched trowel (3/16 inch V-notch for smaller tiles, larger for bigger formats), tile spacers, a wet saw or angle grinder with a diamond blade, level, tape measure, pencil, bucket and mixing paddle, rubber grout float, sponges, and a grout sealer. For adhesive, use a heat resistant tile mortar or mastic specifically rated for kitchen use. Standard mastic can soften behind a gas range that runs hot. It might seem minor, but it matters more than most beginners realize.
For materials, you will need your chosen tiles, premixed or powder thinset (depending on your tile weight), unsanded or sanded grout depending on joint width, and backer board if your existing wall has any soft spots.
Surface Preparation Is Where Most People Cut Corners
Here is where most people go wrong. They look at the wall, think "looks fine," and skip straight to the fun part. That almost always comes back to bite them.
The wall behind your stove needs to be structurally sound, free of grease, and as flat as you can get it. Even a small amount of cooking grease will prevent adhesion. Clean the wall thoroughly with TSP cleaner or a strong degreaser, and let it dry completely. Not mostly dry. Completely dry.
If your wall has any flex to it when you press on it, or if you can feel soft spots, you should install cement backer board first. Tile does not forgive movement. It will crack along grout lines or pop off entirely if the substrate shifts even slightly. Backer board adds maybe two hours to the project and saves you from redoing the whole thing six months later.
Check for flatness using a long straightedge. If you find a dip deeper than about an eighth of an inch, skim it with some extra thinset and let it cure before continuing. Uneven walls cause alignment issues that compound as you work upward, and once you are three rows in you will definitely notice it.
Planning Your Layout Before Opening Any Mortar
Do not skip this step. Tile layout planning is where the final look is actually decided, not during installation.
Find the center point of the wall space behind the stove. Use a pencil and a level to draw a true vertical line down the center. Now do a dry layout on the floor first, spacing tiles out with your spacers, to see exactly how your tiles will fall at the edges. One thing you will notice immediately is whether your end cuts are going to be tiny slivers or reasonable pieces. Tiny slivers look awkward, break easily, and are incredibly frustrating to cut. If you are ending up with a sliver at each side, shift your center line by half a tile width. Problem solved before any mortar touches the wall.
Also decide where your course starts vertically. A lot of people start from the countertop and work up. That works well if your counter is level. If it is not, use a ledger board temporarily screwed to the wall as your starting line instead.
Choosing Tiles That Can Handle The Heat
For the area directly behind a cooking surface, you want heat resistant tiles. Porcelain and ceramic are both good choices. Glass tiles can work but are more sensitive to heat cycling over time and tend to crack if there are any installation imperfections underneath them. Natural stone like travertine looks beautiful but is porous and requires sealing, which adds maintenance.
Subway tiles are popular for a reason. They are easy to cut, install predictably, and look clean. For something with more texture or character, handmade ceramic tiles bring a lot of warmth to a kitchen. Whatever you choose, just make sure you are buying 10 to 15 percent more than your measured square footage. Cuts waste material, and if a tile cracks six months later you will want an exact match from the same batch.
The Actual Installation Process
Mix your thinset to a peanut butter consistency. Not runny, not stiff. If it slides off your trowel before you can press it to the wall, it is too wet.
Work in small sections, roughly two to three square feet at a time. Adhesive has a working time, and behind a stove the ambient warmth can accelerate drying. Thinset drying too fast is a real problem that causes tiles to not bond properly, so small sections give you control.
Spread the thinset with the flat edge of your trowel first to get a thin base coat, then comb through it with the notched edge at a consistent 45 degree angle. Press each tile firmly with a slight twisting motion to collapse the ridges and create full contact. Use your level constantly. Every few tiles, check both horizontal and vertical. Do not assume your previous row is perfect.
Cutting Tiles Around Outlets, Corners, And Edges
A wet saw makes clean straight cuts. For curves around an outlet box or pipe, score with the saw then nibble away with tile nippers. It is slow but it works.
When you reach the edge near the stove itself, leave a small gap between the tile and the stove body. Do not grout this joint. Fill it with a color matched silicone caulk instead. This is an expansion joint that allows the stove to be removed and prevents cracking from the heat differential between the stove and the tiled wall. Most people grout this gap out of habit and then wonder why the grout cracks within a year.
Grouting Without Ruining Everything
Wait at least 24 hours after your last tile goes up before grouting. The thinset needs to cure fully or you risk shifting tiles while floating grout across them.
Mix your grout to a thick but workable consistency. Pack it diagonally across the joints with your rubber float, pressing firmly to fill completely. Then hold the float at a steeper angle and scrape across to remove excess. Work in small sections because grout haze is a genuine problem if you let it sit too long.
Wipe down with a barely damp sponge after about 15 to 20 minutes, rinsing constantly. You will do multiple passes. The haze that remains after the first cleaning wipes off more easily once it dries a bit more. After full cure, apply a penetrating grout sealer, especially around the stove area where grease splatter is unavoidable.
Common Mistakes And Realistic Time Expectations
Beginners consistently underestimate how long surface prep takes, rush the drying time between steps, and skip the sealer. Those three mistakes cause most of the callbacks.
Realistically, for a standard stove backsplash area of around 20 to 30 square feet, expect the full project to take two days. First day for prep and tile setting, second day for grouting and finishing once the thinset cures. Trying to compress this into one day almost never ends well.
Keeping It Looking Good Long Term
Sealed grout is dramatically easier to clean than unsealed. Wipe down after heavy cooking sessions while everything is still warm but not hot. Avoid abrasive scrubbers on grout because they slowly erode the surface over time. Reapply sealer annually if you cook frequently.
A tile backsplash behind the stove is one of those projects that rewards patience and careful prep work. The installation itself is satisfying. You just have to resist the urge to rush the parts that feel less exciting.
That said, not everyone has the time or the confidence to tackle this themselves, and there is absolutely no shame in that. If you are based in Nevada and want the job done right the first time, reaching out to the best backsplash installers in Las Vegas is a smart move. A good installer will handle everything from surface prep to final sealing, and you will know the work is built to last.